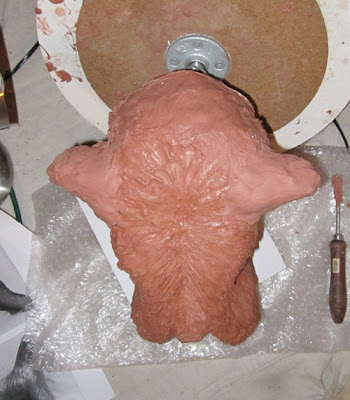
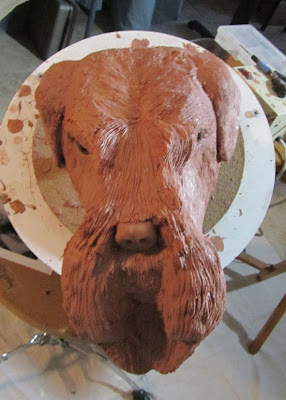
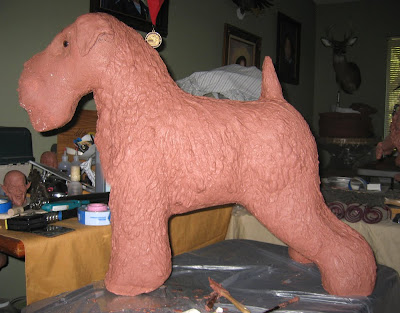
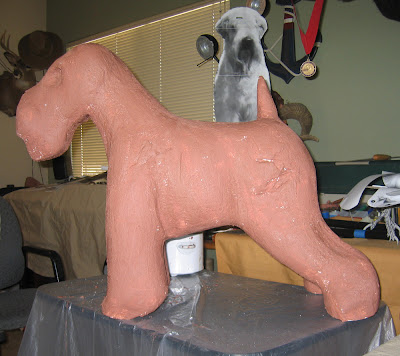
I reset the ears per your request. Please indicate if they need further corrections. Please note we are only looking for over all ear proportions and settings.
This blog will share the complete start to finish process for the life-size Soft Coated Wheaten Terrier Bronze Sculpture. Clay to Bronze Dog Sculpture process...
Bronze Soft Coated Wheaten Terrier Sculpture
The Soft-Coated Wheaten Terrier is a breed of dog originating in Ireland. There are four coat varieties: Traditional Irish, Heavy Irish, English, and American. These dogs have a single coat which sheds very little hair, so they can be more easily tolerated by people allergic to other breeds.
(source wikipedia)
Tuesday, November 15, 2011
Thursday, October 6, 2011
Soft Coated Wheaten Terrier head sculpture
The head was reworked in order to match the most current images of Oxford the Soft-coated wheaten terrier.
Friday, September 16, 2011
Wheaten Terrier dog sculpture's head gets detailed
Today I added some of the detail on the head section. The goal was to work on the overall hairlines to give it a realistic look.
Not sure how much hair I should place over the eyes.
Front view, the right side of the dogs face has not been detailed. Right now, I am working on the top and left side, once the client approves the left side of the face, I will work on the right side.
Diagonal view
Wednesday, September 7, 2011
Dog sculpture head detailing for the Soft Coated Wheaten Terrier
I finally detached the head from the body and adhered it to the tilting table. The tilt table allows me to access hard to reach areas.
The head section is still somewhat rough and will require several more passes in order to add the detail.
Tool used to add the hairline texture for this commission.
On the first pass I added somewhat rough hairlines to see if I was going to be happy with the overall look. Lucky for me it was a very hot day here; therefore, the clay was on the soft side for this procedure.
Just by viewing this image, I can already tell I need more relieve on the beard section.
Once I am happy with the over all look of the fur texture, I will add a few lose hairs over the nose and perhaps eye area (not sure yet)
Thursday, September 1, 2011
Dog sculpture fur texture detailing
Here are some images of the texture I will be using for the Wheaten's coat. The texture will be revisited several times until the clay shavings are removed.
Labels:
bronze dog sculpture,
clay sculpting,
dog fur texture,
how to
Monday, August 15, 2011
Dog sculpture final critique before detailing
Mike, please advise as to which shoulder your like best.
Once this phase is approved, I will detach the head and begin to create the coat hair throughout the entire body. Once the body and head are somewhat done, we will play around with the cocking of the head. If you already have a preference as to the direction of the head tilt. Let me know, this way I can have the beard slightly point into that direction (I need to pay attention to our law of gravity).
Mike, in conclusion if you have a higher resolution image(s) showing his coat pattern, please email; otherwise, I will use the images I have. Looking for sharp images. The last image in his show stance, was somewhat blurry. I other words, I could not make out some of the hair line patterns. Now if the three images used on the header of this page display the correct hair patter, let me know and I will use them as my studies. The only concern is that the images used at the time did not have the full show coat.
Tuesday, August 9, 2011
Clay dog sculpture of a soft coated wheaten terrier
This is the 3-4 coat of the clay brush up. The clay sculpture will undergo an additional two coats. The left rear leg does not look right; therefore, I will add more clay to the outer side of the leg in order to match the right rear leg.
Once the over all confirmation is correct the intermediate detail will begin.
Tuesday, July 5, 2011
Nose Job for Oxford the soft coated wheaten terrier
In addition to applying the second coat of clay to the dog sculpture I decided to add his nose. The nose is basically complete and fully detailed, I will work the facial hair around the nose later.
Soft Coated Wheaten Terrier receives the second coat of clay
Today I applied the second coat of clay; while focusing on the client's request to give Oxford the wheaten terrier his full show coat. Areas on the back side of the neck and chest were built up to give it the correct profile.
In comparing the sculpture to the image below, I may have added too much clay on the chest, as well as t he back of the neck. I will wait for the client to instruct me on how much to shave off.
Before, I forget... The clay is Chavant NSP Hard and I purchased it from one of Chavant's clay distributors, AFASupplies.com. They are a new online sculptor art supply store.
Friday, June 17, 2011
Applying the clay to the dog armature - clay to bronze
This video show the procedure for applying the clay on to the dog form/dog manikin. I melt Chavant NSP Hard in a crockpot and use a brush to apply the layers of clay. Set the crockpot to low, too high of a temperature will burn your clay. Four pounds of clay took about 3 hours to melt.
This dog sculpture will undergo 3-4 coats of clay before I begin the detail work.
Labels:
chavant clay,
clay on foam,
clay to bronze,
clay up,
dog armature,
dog art,
dog artist,
dog form
Friday, May 20, 2011
Bronze Dog Staute foam armature ready for clayup
This post will show how I use images to help me line up the foam to the dog confirmation. This is extremely important when the client is looking for correct body proportions...etc. The clay-up/skin that is applied with a brush will only be about 1/4" to 1/2" thick; therefore, I try to get as close as possible with the foam armature.
The goal is to try to keep the sculpture as light as possible. The legs need to be able to support the weight of the clay.
I will not be supporting the legs with aluminum rod for this soft coated wheaten terrier, since his legs are short and stocky. Aluminum rods are some time used when the foam legs are not strong enough to support the sculpture. For instance, rods were used on the life sized bronze poodle.
Thursday, February 24, 2011
Soft Coated Wheaten Terrier study head-shots
The client has supplied me with these excellent head-shots of his Soft Coated Wheaten Terrier. The images will assist me greatly in capturing the likeness of Oxford.
Tuesday, February 22, 2011
Dog armature work-in-progress
More work on the Styrofoam dog armature. Due to the annoying noise of the rasp against the foam, this will be the last video on this phase.
Friday, February 11, 2011
Dog Sculpture armature made of Styrofoam
Here I am trying out my new sanding gloves. I discovered that they are not as course as I would have like them to be; however, they do appear to work well for smoothing the surface.
Thursday, January 13, 2011
Glass eyes for Soft Coated Wheaten Terrier
Here are the glass eyes I will be using for the clay sculpture. Normally I will use clay for the eyes, but the clients requested the original clay sculpture of their Oxford, the Soft Coated Wheaten Terrier. The taxidermy eyes will give Oxford more of a life-like appearance.
Sanding Gloves for shaping Styrofoam
I came across these sanding gloves and I am hoping they will assist me in the shaping of the foam that will serve as the armature.
They are suitable for both left and right handed users, for faster and comfortable, hand sanding. I ordered two so that I can use them on each hand.
When sculpting, symmetry is important. In other words, what I feel on one hand I ensure the other hand will shape accordingly.
The sanding glove comes with one coarse 60 grit pad. The 60 grit should be able to remove the desired amount of foam. In the past I used rasp, but they have their limitation.
Conforms to all types of shapes and surfaces, the firm yet flexible structure of the sanding glove helps eliminate fatigue encountered when holding a sanding block and the open mesh fabric provides ventilation.
Wednesday, January 5, 2011
Roughing out the styrofoam dog with hotwire tools
The audio to this video has been disabled by Youtube.com since the background music contained copyrighted material. However if you wish to view the video with the audio, you can visit this URL: http://www.ustream.tv/recorded/11837966
These videos demonstrate the tools and steps I use to rough-out my Styrofoam dog. The foam dog is used for the armature.
Sunday, January 2, 2011
Soft Coated Wheaten Terrier armature
The video show how I use a hotwire to cut out the Styrofoam pattern that will be used for my armature.
Labels:
dog armature,
hotwire,
soft coated wheaten terrier,
Styrofoam
Saturday, January 1, 2011
Hotwire and foam setup for dog armature
Preparing the hot-wire, Styrofoam; table for the Sunday noon foam cut-out that will serve as the armature for the bronze soft coated wheaten terrier sculpture.
The canine outline has been marked onto the block of foam. The orange arrows indicate the hot-wire that is used to cut the foam.
Special Christmas Gift for a Special Person
The bronze dog sculpture gift was presented as a Christmas gift. Per the feedback I received... the gift went extremely well. Merry Christmas... :)
Subscribe to:
Comments (Atom)
Live sculpting broadcast by HandsofCaesar.com
The top screen is used when I am broadcasting live from www.ustream.tv/channel/tutorial%3A-how-to-sculpt-in-clay---artistsculptor
When I am not broadcasting a list of current short movie clips are played.
I will try my best to embed the short videos recorded from the live broadcast on this blog.
click here or on the image to see me live on
my ustream.tv channel... 12:00 - 6:00 PM PST


